23 Jan
To engage your audience, you’ll have to be able to capture their attention in meaningful ways and push notifications can do this for you.
Fortunately, push notifications offer an effective solution. Push notifications are a way for publishers and other businesses to deliver direct, real-time messages to their audiences, in order to help promote engagement and drive traffic.
Push notifications are an excellent resource for any marketer who wants to increase engagement with their brand. Because push notifications are non-intrusive, easy to set up, and can bring instant traffic to posts, landing pages, product launches, and more.
What are push notifications?
Push notifications are short popup messages that appear on a user’s desktop or mobile. These messages are clickable and will take the user to the desired URL. They can notify or update customers about many different things and don’t require the user to be on your website to receive them.
Moreover, you can display notifications to users who have visited your website before and get them to come back. Push notifications can be used on all devices including desktops, laptops, tablets, and smartphones. So no matter which device the user is on, they’ll get your message.
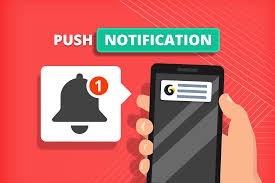
Here’s an example of a push notification on the desktop.
Why use push notification?
According to research 75% of people who visit your site will never come back. But don’t worry! There are ways by which you can get visitors back by email marketing, SMS marketing, social media, and push notifications. Out of the different marketing tactics, push notifications are very effective and you can see a high return rate of visitors.
They are easy to use, it’s simply a click. There’s no need to enter an email address or phone number so it’s definitely a preferred option among many people. There are so many more reasons why push notifications work. Here are a few important reasons:
- Users have the option to allow or block your notifications giving them control over whether they are interested in your messages or not. Users can also snooze notifications if they want to temporarily pause them.
- Messages appear as pop ups that are hard to miss and can be viewed without needing to open them like an SMS or email.
- Push notifications contain very few words and require a very short attention span. They get the point across immediately.
- Compared to emails and SMS, people receive far lesser push notifications which mean it’s less likely to get lost among spam.
These reasons make the click-through rate for push notifications much higher than emails.
Benefits of using push notifications
Push notifications are clickable popup messages that can be used on browsers or mobile devices and apps. They’re a form of instant, real-time, direct communication. By using push notifications, publishers can:
- Reach their readers where they spend most of their time, on their mobile devices
- Add a new channel they control directly, which is similar to a newsletter, but with higher open and click-through rates
- Drive engagement and return visits, helping turn casual visitors into loyal readers and creating habits
News and content publishers in particular stand to benefit from push notifications. After all, they offer an effective way to deliver time-sensitive content, stories, and updates to readers. Push notifications can also fill the same role as a newsletter when it comes to building a base of loyal readers.
Another benefit of push notifications is the simplicity of the opt-in process. For example, first-time visitors to your site or mobile app will only need to select Allow when prompted, and can then be added to your subscriber list.
Creating push notifications in WordPress
Now you might be wondering how hard it’s going to be to add push notifications to your site, but the fact is it’s just about a few clicks to add push notifications to your website.
For this tutorial, we’ll use PushEngage to create push notifications. It is the leading push notifications app on the market. PushEngage has powerful features to help you boost engagement, traffic, and return rates. Additionally, it lets you easily create custom push notifications and it automates the process so that you can spend minimal time setting it up and get maximum returns.
Step 1: setting up your PushEngage account
The first thing you’ll need to do is set up an account with PushEngage. To do this, go to the PushEngage website and click on the ‘Get Started For Free’ button to create an account.
With this free plan, you can send 120 notifications to 2,500 subscribers every month. As your site grows, you can upgrade your plan to get more features and extend your subscriber limit.
Once you’ve signed up for an account, the PushEngage dashboard will open. You’ll need to go to the Settings » Site Settings » Installation Settings page. Here, you can enter your site’s name and URL. You can also upload an image of your site or your logo which will appear in your push notifications.
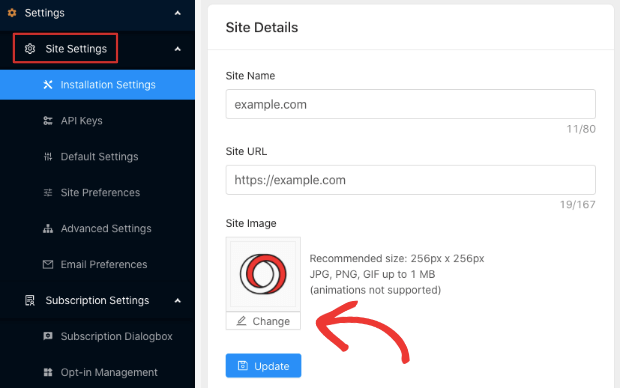
The recommended size for the image is 256x256px and it accepts PNG and JPG formats. After you’ve uploaded the image and added your site’s details, your PushEngage account is ready.
Step 2: Connecting PushEngage to WordPress
Once you have signed up, now you need to connect your WordPress site to your PushEngage account. For this, scroll down on the same Installation Settings page. You’ll see options to choose your website type where you need to select ‘WordPress’.
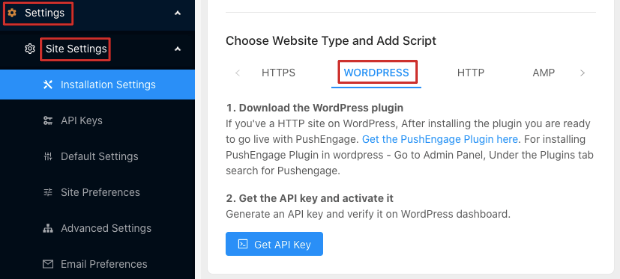
Following the instructions given here, first, install and activate the PushEngage plugin. You simply need to find the PushEngage plugin in the WordPress repository and install it on your site. But still, if you need more help on this, check out this guide on how to install a WordPress plugin.
If you’re using HTTPS on your site, you’ll need to carry out an additional step here. On the same Installation Settings page on your PushEngage dashboard, open the ‘HTTPS’ tab. Then, you need to click on the ‘Download Service Worker File’ button and a zip file will save to your computer.
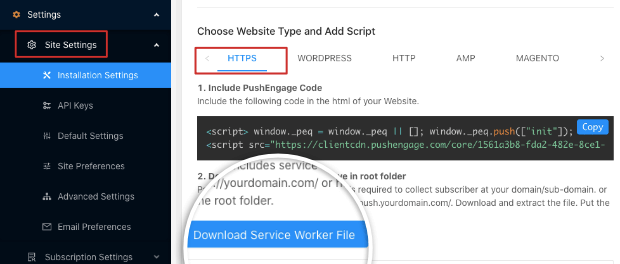
When you unzip the file, you’ll get a file named ‘service-worker.js’ which is a Javascript file. You’ll need to upload this to the root folder of your site. You can do this using cPanel » File Manager in your web hosting account. By default, the root folder is named public_html and will contain three sub-folders called wp-content, wp-includes, and wp admin inside.
Note: In case you or your developer has renamed the website folder, you’ll need to select the folder accordingly.
Next, simply use the upload button, select the file on your computer, and upload it to the public_html folder.
You can also connect to your website’s folder using an FTP client like FileZilla. For more details on this, check out this guide on using FTP to upload files.
Once you’ve done that, you can open your WordPress dashboard and select the PushEngage plugin from the menu. You’ll see a window with ‘Instructions’ and ‘Setup’ tabs available. Switch to the ‘Setup’ tab where you’ll need to enter your API key.
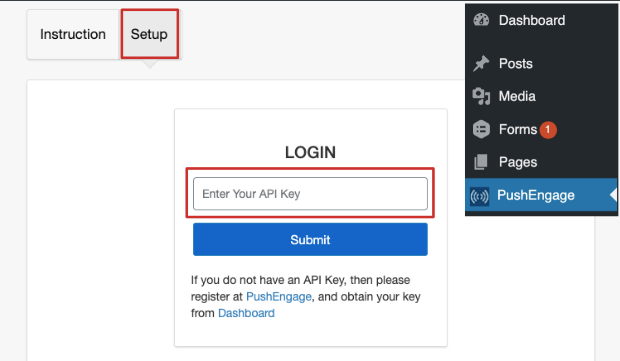
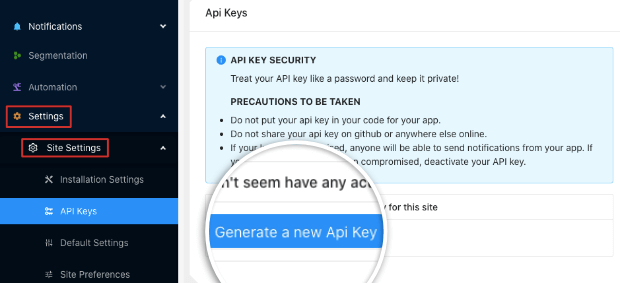
If you don’t have this key, go back to your account on the PushEngage website. Here, navigate to Settings » Site Settings » API Keys. Simply click on the ‘Generate a new API Key’ button and an API key will be created for you.
Now, copy this key and head back to your WordPress dashboard to paste and submit the API key. This will open up the PushEngage settings page on your site. Here, you’ll see that your site’s details and API key have been filled in automatically.

Your website is now successfully connected to your PushEngage account and you can start creating your notifications.
Step 3: Creating push notification message
In the settings page, you can see a lot of options to choose from. Let’s learn about them to create your push notification campaign.
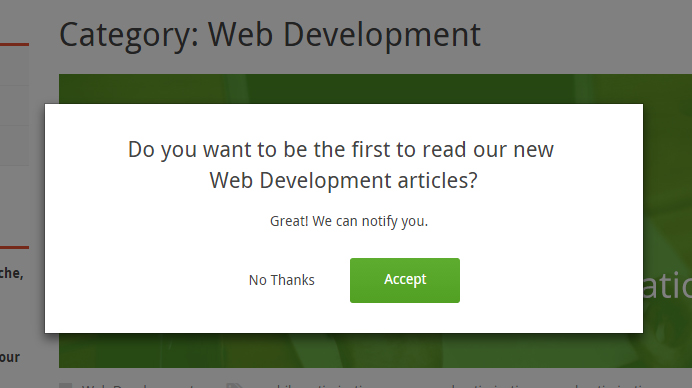
1. Create optin message
First, you need to set up the optin message that will prompt people to subscribe to your notifications.
To do this, switch over to the ‘Subscription Dialog Box’ tab where you’ll see a preview of the default push notification on the right. To customize this message, you’ll see options on the left-hand side.
First, you can change the dialog box type. We’ve selected ‘Safari Style Box’ for our campaign. You can also change the title and button text that will appear in the notification. When you’re happy with your settings, click on the ‘Update Optin Settings’ button to save your changes.

2. Change intermediate page message
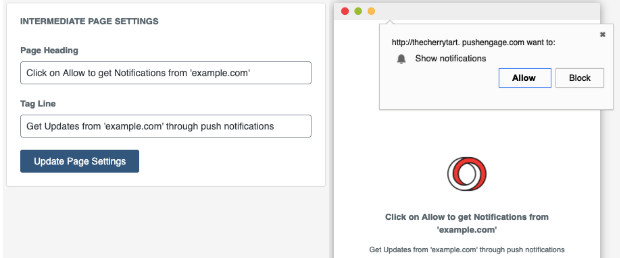
Next, when a user clicks on your notification to subscribe, they will be taken to an intermediate page that asks them to ‘Allow’ notifications. You can change the message that’s displayed on this page as well.
On the same page, scroll down to ‘Intermediate Page Settings’ to change the page heading and tagline. You can see a preview of the page on the right-hand side so you adjust your message accordingly.
In this preview, you’ll also see a browser popup that has a bell icon with ‘Show notifications’ text and the ‘Allow’ and ‘Block button’. You won’t be able to change this popup because these are default browser settings and not a part of PushEngage.
Once you’re done with the notifications, don’t forget to click the ‘Update Page Settings’ button.
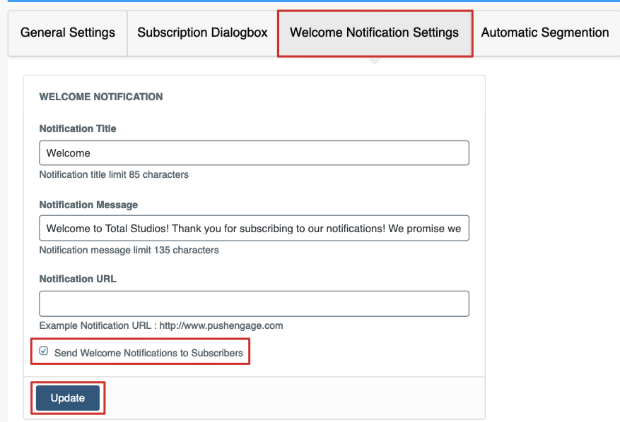
3. Create welcome message
You can display a popup that welcomes and thanks the user for subscribing. To create a welcome message, switch to the Welcome Notifications Settings tab.
On this page, you can type out a title and message to welcome subscribers. You can also set a condition that will take your users to your home page or a specific page. When you’re ready, check the box that says ‘Send Welcome Notifications to Subscribers’ and then update your settings.
With that, you’ve successfully created the subscription optin and welcome messages.
Step 3: Testing push notification
Before making anything live, it’s better to test if your campaign is working as expected. To test your push notifications, simply open your website in your browser and check out how it looks. You should see a subscription dialog box open immediately with the ‘Allow’ and ‘Block’ buttons. You’ll see the same notification appear on mobile as well.
When you click the ‘Allow’ button, the intermediate page will open up in a separate popup window. This will also have the browser popup present on the top with ‘Allow’ and ‘Block’ buttons.
Here too, you’ll need to click on the ‘Allow’ button. Upon doing so, the welcome message should appear on your screen in a few minutes. In case a visitor closes the popup without subscribing, a bell icon will appear at the corner of the site. If you hover over the icon, you’ll see a text bar appear that says ‘Subscribe to notification’. This allows your visitors to subscribe at any time.
Moreover, If you want to customize this bell icon and text, head over to Settings » Subscription Settings » Opt-in Management in your PushEngage dashboard. You get to choose a bell icon or a button widget on the side of the page.
Once you’ve made your selection, you can customize the color, text, position, and placement of the widget to match your website. You can preview the widget to see how it looks and then update your settings to make it live. Now you can be sure your notifications are working correctly and they look great too.
Do more with PushEngage
PushEngage is a pack of features to help you optimize your push notification campaigns. We’ll explore a few of them that we think are really helpful.
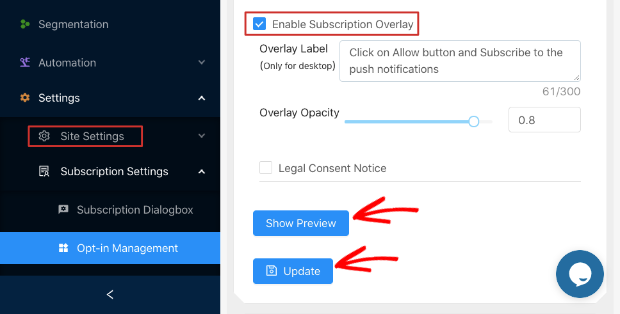
1. Create an Overlay Popup
You can set up the notification to appear as an overlay popup on your site. This draws more attention to the popup by fading out the background and focusing on the popup.
To set this up, go to Settings » Subscription Settings » Opt-in Management and scroll down to the ‘Subscription Overlay’ section. Here, you can customize the label and then check the ‘Enable Subscription Overlay’ box to activate this feature.
2. Trigger subscription notifications on click
You can trigger the subscription optin popup when a user clicks on a button. Here too, go to the Settings » Subscription Settings » Opt-in Management page.
You’ll find this option under the ‘Subscription Opt-in Additional Trigger’ section. First, activate it by checking the ‘Enable Additional Trigger’ box.

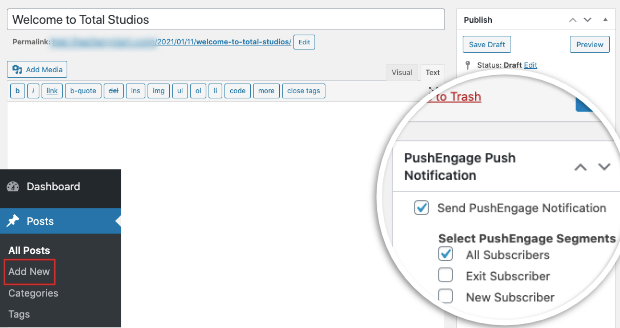
3. Enable Notifications in Posts and Pages
PushEngage gives you the option to enable notifications for individual pages and posts that you create on your site. In the post edit page, you’ll see a PushEngage section in the settings panel. You can push the notification to all subscribers, new subscribers, or exit subscribers.
5. Track your notifications and optimize them
PushEngage lets you track how well your notifications are performing to help you determine what’s working and what’s not. This helps you optimize your campaigns and get better results.
When you open the dashboard in your PushEngage account, you’ll see a summary of your push notifications performance. You’ll see how many notifications were displayed, how many active subscribers you have, along with the total clicks and click-through rate.
For more data analytics, visit the Analytics tab in your PushEngage account and you’ll get different statistics of your campaigns.

Conclusion
A push notification that is short and simple is more effective than those with lengthy contents. So, you need to make the text more concise and easier to read. Always get the message straight to the point.
Thus, you can consider creating a sense of urgency to make your customers feel the need to click the push notification. As a business owner or online marketer, you know precisely the importance of increasing the traffic on your site. So, it is necessary for you to take advantage of push notification advertising.